May 15, 2011 - Graduate Cake
Click here for short instructions
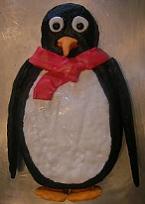
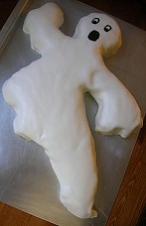
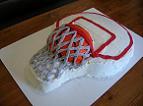
With soon-to-occur graduation parties abound, deciding a theme for this blog post was easy. In the past, I've seen two predominant types of graduation cakes. The first is the traditional rectangular or circular cake, decorated with a congratulatory note and perhaps a "diploma" on top. The second (and the one that I used to make) is a circular chocolate-iced cake with a chocolate square on top (to look like a graduation cap). Though I'm certainly a fan of both of these cakes, I thought that it was time for a little more variety. Now imagine your graduate's/guest's amusement when they'd see a personalized cake like this:

Though this cake involves a few steps, it really isn't that hard to make. You'll need a Cake-Shaping Strip (look here about how to make one), a sheet pan, prepared cake batter (from about 1 1/2 boxes of cake mix), Chocolate Decorating Clay (look here about how to make this), Peanut Butter Decorating Clay (look here about how to make this), one package of chocolate chips, 2 tablespoons of vegetable oil, a sheet of paper, a twist tie, and icing (about 1 16-oz. white-icing container and 1 16-oz chocolate-icing container).
First, make a cake-shaping strip as described here using six sushi-mat segments. Line a baking sheet with heavy-duty aluminum foil, and then shape the strip in the form of a graduate (don't worry about the hat yet). Wrap the bottom foil around the outside sides of the strip, and use extra small strips of foil or small wads of foil to prevent cake batter from leaking through places where the foil wrapping is questionable (e.g., by the graduate's neck or under her arm).
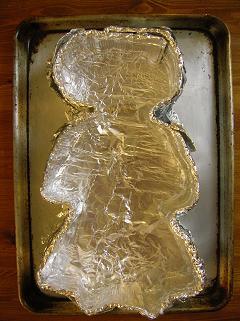
Spray the strip and foil with cooking spray. Pour the cake batter in the "cake pan" and bake until the cake is done. (I used chocolate batter this time. It's been a long time since I've made a chocolate cake, and I missed it.) Carefully remove the strip from the cake. You can place a knife between the strip and cake to assist. with the separation if you find that helpful. Transfer the cake to your serving tray.
I used a disposable tray this time around, as it was white, and I thought that it would contrast with the cake well. Let me warn you about disposable trays ... they really absorb grease. So they'll show any spots where you spilled some extra icing, and if you let your cake sit on it for awhile (e.g., overnight), you'll get a wet-looking border around your cake. My advice: stick to plastic or glass trays. Some plastic trays are only a few dollars, so you can leave them at someone else's house without missing them.

Apply a crumb-coat to the cake. This will prevent any dark chocolate crumbs from showing.
While that's drying, make some Chocolate Decorating Clay and some Peanut Butter Decorating Clay. Look here for instructions on how to make various kinds of Decorating Clay. I made two batches of the Chocolate Decorating Clay and one of the Peanut Butter Decorating Clay, and I had plenty. If your graduate is wearing a colored robe rather than a black one, make the Bright, Flavored Decorating Clay rather than the Chocolate. After making rolled fondant for the first time last week, let me tell you how glad I was to go back to the Decorating Clay. The Decorating Clay just comes together in the mixer ... no kneading needed. And it's easier to roll out. Maybe I'm biased ....
Okay, back to the topic. So despite my disappointment with the effort involved in fondant from a few weeks ago, I was inspired to attempt to adopt some of fondant's techniques to the decorating clay. So I decided to try to roll out the decorating clay between vinyl mats, like is done with rolled fondant. I started with the Peanut Butter Decorating Clay.
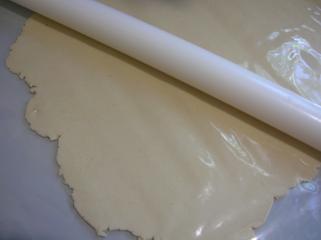
Make sure to brush (using a brush or your hands) a thin layer of powdered sugar on the bottom mat and the top of the clay (beneath the top mat) before rolling it out. Otherwise, part of the clay sticks to the mat. This is not at all a catastrophe, but it's easier if it doesn't.
Once the decorating clay's rolled out, ice the head/neck portion of the graduate clay with a medium-thick layer of icing. Then, remove the top mat from the rolled decorating clay, and flip the rolled decorating clay onto the cakes head. Gently push the clay into the sides of the cake and cut away the excess decorating clay.
Did your decorating clay happen to tear? No problem. Place a table knife under a stream of hot water or dip it into a glass of hot water, and gently run the flat side of the knife over the area with the tear. It should become smooth and uniform.
Take some extra decorating clay and make a nose. Place it on the cake's head, wet your finger, and gently run your finger along the creases of the nose in order to make it smooth with the base layer.
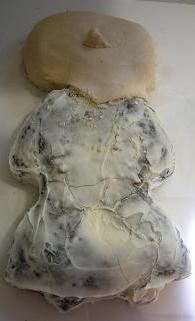
Now roll out the Chocolate Decorating Clay as you did with the Peanut Butter Decorating Clay. Apply a medium-thick layer of chocolate icing to the bottom part of the cake, and flip the rolled decorating clay onto the bottom portion of the cake. Gently push the decorating clay into the sides of the cake and cut away the excess decorating clay.
Take a small sheet of paper, roll it up, and "tie" it was a twist-tie. This is the diploma. Place it on the middle of the cake.
Use extra Chocolate and Peanut Butter Decorating Clay to form the bottom sleeve portions and bottom portions of the graduate's arms and her hands. Position the hands to look like they're wrapping around the diploma. Use the wet-knife process described above to make the sleeve portions continuous with the bottom layer.
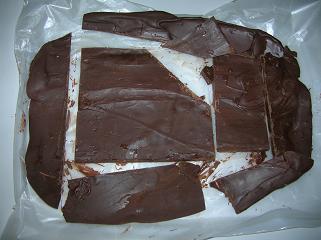
Now onto the hat. Place a sheet of wax paper on a large tray or lid. Combine one bag of chocolate chips and two tablespoons of oil in a microwave-safe bowl. Microwave for 30 seconds. Stir. Another 15 seconds. Stir. Another 15 seconds. Now you should have nice, smooth, melted chocolate. Pour it onto the wax paper. Freeze the chocolate layer just until it hardens. Use a table knife, and "score" a graduation hat. Then, slowly "saw" into the chocolate until the hat is cut. It shouldn't be completely square, as it should have an angled side so that it can rest on the cake tray. (See below.)
Use chocolate icing to ice on the graduate's cap, and apply a medium-thick layer of icing to the top of the cake. Attach the cap there. Pipe on her hair, lips, and any other features. Now that's a custom cake! Congratulations to all graduates!!!!
|