|
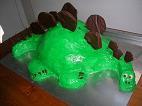
July 21, 2011 - Stegosaurus Cake
Click here for short instructions
First - I must let you all know that this is an early substitute blog for the August 1 blog. I'll be out of town then, but made sure to make up in advance for the missing blog post. So the next blog post will be around August 15. Now - on to the cake:
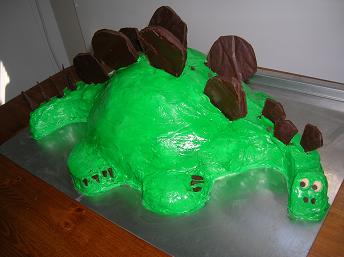
I was recently invited to a little boy's birthday party. He happened to be a big fan of dinosaurs, so I volunteered to make a dinosaur cake. It was decided that this would be an upright stegosaurus, unlike the side-profile dinosaur cake that I made before. I nonetheless wanted to use the Cake-Shaping Strips over the Cake-Shaping Clay, because this cake was supposed to feed a lot of people and had lots of large height variation. So I got my thinking cap on.
To make this cake, you'll need a Cake-Shaping Strip (look here about how to make one), a sheet pan, heavy-duty aluminum foil, prepared cake batter (from about 3 boxes of cake mix - but see my notes below about how to prepare it), icing (from about 3 16-oz. white-icing containers dyed as you wish), food dye, 24 ounces of semi-sweet chocolate chips, 2 tablespoons of canola/vegetable oil, 1 sheet of wax paper and about 1/4 cup of mini chocolate chips.
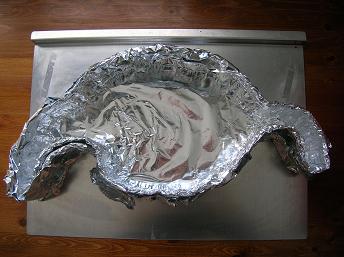
First, make a Cake-Shaping Strip as described here using ten sushi-mat segments. Line a sheet pan with aluminum foil, and shape the strip into a dinosaur shape. The picture below shows you the shape that I used. If I were making the cake again, I'd do it slightly differently. As you can see, the final cake (shown above) has dinosaur legs. The strips' outline does not. I ended up deciding that legs were a good addition after the initial cake was made. So I had to cute apart extra cake scraps and attach them to the cake with icing. This was messy and one of the main things that is nice to avoid using the strip. SO ... I'd change the design below to include legs.
Once you're happy with the shape, wrap the strip with the bottom foil layer. Cut the foil as you need to wrap around the strip, and add small balls of foil into any outer corners where you think cake batter might leak through.
Spray the foil and the strip with cooking spray. Now prepare cake batter using two boxes of cake mix. HOWEVER - when you're making them, use less liquid than they recommend.The box that I was using called for 3 eggs, 1/2 cup oil and 1 1/3 cups of water to be added to mix from a single box. I only added a single (1) cup of water, along with the recommended oil and egg quantities. (Because I was making two boxes, I used 2 cups water, 1 cup oil and 6 eggs.) The idea was to make the batter a little thicker so that it would not spread as much while baking.
Now strategically pour the prepared cake batter into your new pan. Why do I say "strategically"? Because if you're careful about it, the way that you pour the batter in can somewhat determine the vertical contours of your cake. I tried to pour only a very little bit of batter near the ends of the tail and head so that it would slope downwards.
Heat your oven to 375 degrees. I know that this is hotter than what the box recommends. Let me tell you why I'm recommending this. Have you ever had a "dome" cake - where the middle of your cake is substantially higher than the rest? The cake pros will tell you to use a large serrated knife to cut off this bump and make it level. Another trick to avoid the dome is to lower your oven temperature by 25 degress (to 325 degress). However, here, I WANTED a bit of a hump. So I raised the temperature.
Bake until the cake is done. Cut away any "leaked" cake portions, and gently separate the strip from the cake. Here's what I ended up with:
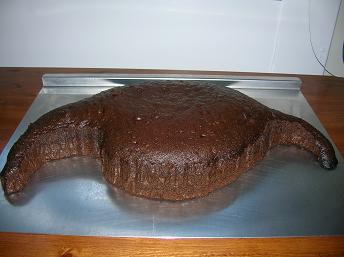
Do you see how the center's taller than the rest of the cake, and how the head/tail slope downwards? Nevertheless, I was going for a really big hump this time, so I had another idea. I'd make one MORE box of cake mix. Then I baked it in my KitchenAid mixing bowl. I prepared this one just according to directions. Then I used a serrated knife to cut off the top bump, I put a layer of icing over the shaped cake, and topped the shaped cake with the bowl cake. As an alternative, you could try to use more cake batter in the strip, or use a smaller dinosaur outline. This would make your shaped dinosaur cake taller in the center (though inevitable spreading of the batter would like prevent as dramatic of the height variation that you can get by using the top bowl cake). As I mentioned, I decided that I wanted legs, so I used some of the scrap bowl portion to make little legs and also attached them using icing to the cake.
Since there was lots of icing gluing, and since it was a chocolate cake, I applied a crumb-coat layer (a thin layer of icing) to the whole cake and let it sit for about an hour. Then I iced the whole thing green, as I was assured that stegosauruses were green.
Combine the 24 ounces of semi-sweet (not milk) chocolate chips and 2 tablespoons canola/vegetable oil in a microwave safe bowl. Microwave for 30 second intervals, stirring in between, until the chocolate mixture is smooth. Line a large tray with wax paper, and pour the chocolate onto the wax paper. Refrigerate the chocolate layer. Once the chocolate is hardened, cut dinosaur plates, spikes and nails out of the chocolate. You can use a table knife. Just repeatedly trace the outline of the shapes that you want. Put these pieces in the freezer for 5-10 minutes.
Cut small slits along the dinosaur's back. Then stick the chocolate plates and spikes into these slits.
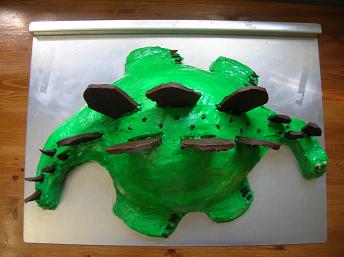
Place the nails onto the legs. Ice the face however you'd like, and add some dinosaur spots using mini chocolate chips. If this cake is going to be served in a slightly warm environment or sitting out for awhile before serving, I'd definitely recommend refrigerating it beforehand (or even putting it in the freezer for 10-20 minutes). This will help prevent chocolate-plate melting.
|